Add2App — Adding Flutter Module to Android Project
Well, we all have those traditional legacy Android applications practically it is sometimes impossible to rewrite those application to an New Framework.
But when it comes to Flutter we have an great advantage, We can able to add an Flutter module to our existing Android or iOS Projects and communicate between both the modules using Platform channels.
In this article, I will explain about adding an Flutter module to existing Android Project and the difficulties I faced during this process.
Steps to Add Flutter Module
- Open your Android Project
- Goto File> New > New Module
- Select Module type as Flutter Module
- Click Next.
- Provide package name, module name and other configurations for your Flutter Module
- That’s it now you have created your flutter module
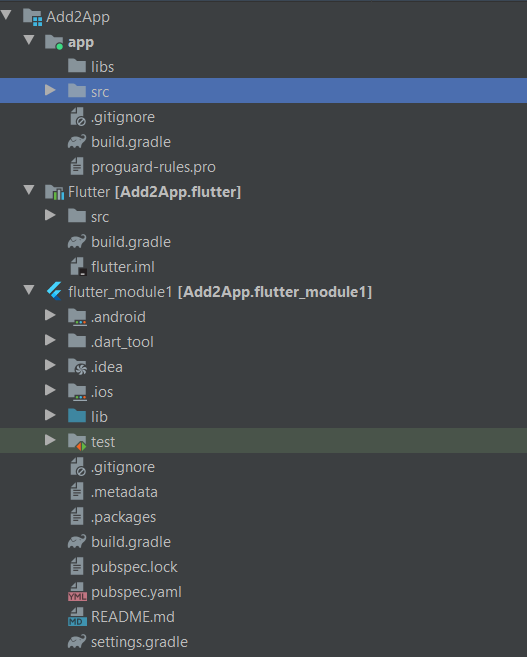
After Adding the module, In Project Pane you will be able to see something like this below image

In Addition to our android module we can able to see two new directories
- Flutter — This gets added to our app level gradle file
implementation project(path: ':flutter')2. flutter_module1 — This will internally be configured inside our Flutter directory
Warning: You are not supposed to write any code inside .android/.ios directories. Since those are generated code, because the next time you run flutter clean these directories will be deleted.
Now you can able to choose between Flutter and Android project

You can also directly open your Flutter Screen from Android Project just like initiating an Activity.
startActivity(FlutterActivity.createDefaultIntent(this))But they are multiple other ways to do this, you can read more about it here
FlutterActivity creates its own FlutterEngine by default. Creating an FlutterEngine is an Non trivial task which means you Flutter screen will be visible after an delay. To avoid this delay, it suggested to initiate FlutterEngine from Application class.
Well this sound easy but during this process you might get face some road blocks like
Android Studio Unable to Add Flutter module Automatically
The Gradle files could not be updated automatically.
To use your Flutter module in this Android app you’ll need to edit the files as described in the ***** documentation.

Sometimes Android Studio will shows this dialog when you add an flutter module.
In such case all you need to do is check if your Android Application Module name is app if it has any other name instead of app like base or core you will face this issue.

If you look deeper into this issue in flutter.gradle file. This belong to the flutter project. They are expecting us to configure flutter.hostAppProjectName in gradle.properties.
If we fail to do it this error will happen. You can either add it to gradle.properties or rename your directory to app using Refactor option available in Android Studio. In my case adding it in gradle.properties doesn’t seem to work. So I had to refactor my module name from base to app. This is also an easy task when you have smartest IDE in the Universe.
If you still face the issue try adding the plugin manually as explained here.
Multi-Module Project
If you are using multi module project like dynamic feature, then you might face issue accessing your Flutter dependencies in your feature modules. In such case just change implementation to api in App level build.gradle file
api project(path: ':flutter')I just wanted to share my experience.
Thanks for reading
In my next article, I will talk about communication between native and flutter modules using Platform Channels.
